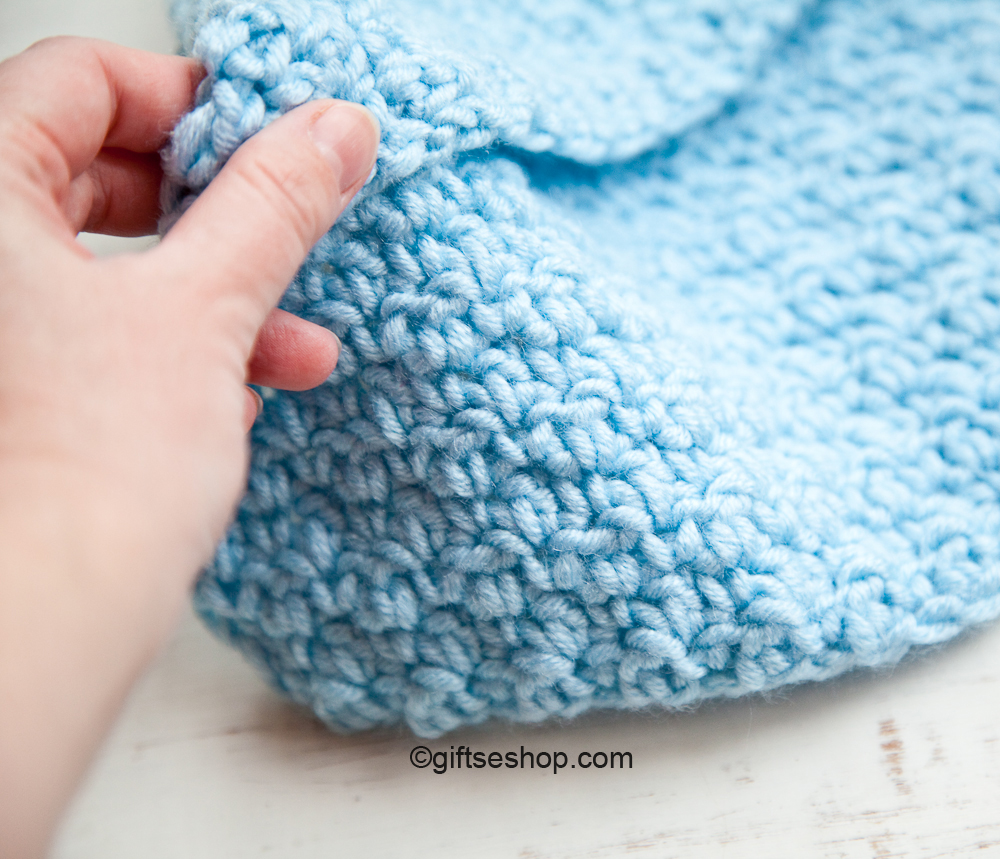
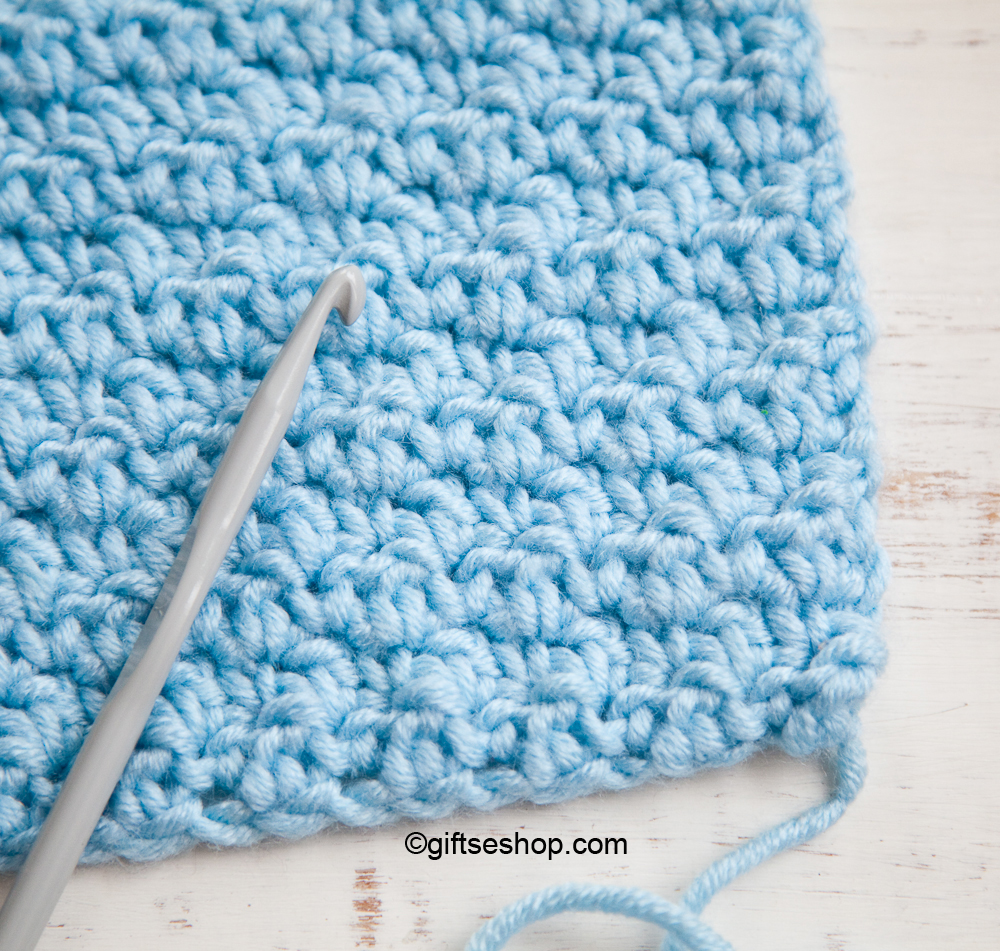
Snowflake coasters for cups, for drinks or for Christmas tree- crochet Christmas decor. This coaster is crocheted with the yarn 100 % cotton. Hook US G6/4 mm. Crochet coasters by your hands is a great idea as a present for your relatives, friends or colleagues on any occasion. You also can decorate your house, your Christmas tree with crochet snowflake and it’ll give your home inimitable comfort and charm.
Go to videoCategory: Crochet free patterns
Crochet hats, booties, blankets – free patterns
Easy Crochet Flower Little Rose Video Tutorial
Make your own crochet flowers with any yarn from your stash the matching crochet hook. A quick easy pattern ideal for every crocheter. Flowers will look great on your clothes as an applique; it’s good for card making, sewing, embellishments, jewelry making, scrapbooking.
Go to videoEasy to Crochet Lace Ribbon Band for Headband

This easy crochet ribbon cord for beginners. This beautiful lacy crochet pattern is great as a headband, bookmark , home decoration (for holding an open curtain), or use it as a part of a lace project. It is the perfect accessory for any occasion, especially for upcoming summer season.
Crochet Flower Video Tutorial – How to Crochet Six Petal Flower
Jar Lid Covers Crochet Pattern – Home Decor
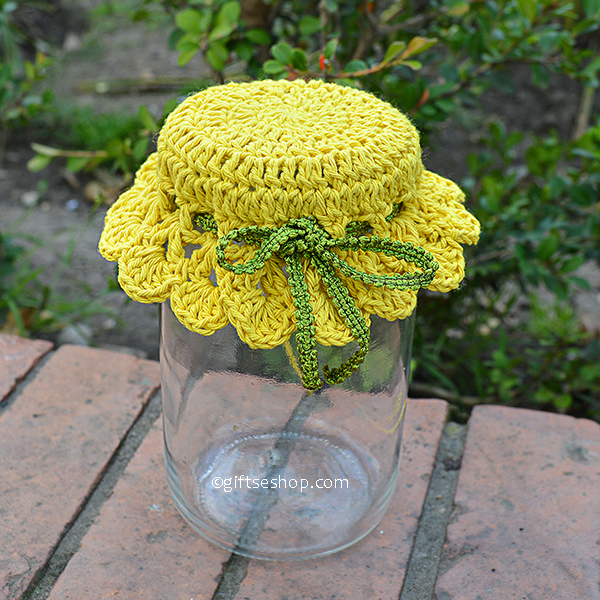
Home-made preserves make a wonderful presents.
With a crochet hook in hand, you can make a very quick and simple Jam Pot Cover. I think it has a wonderful retro appeal which looks fabulous sat upon a shelf or dresser.
So give the pattern a try, and by all means, please try your hand at canning some jam!
Skill level: easy / beginners
Hook: Made with 3.25mm/D3 hook, or size needed to obtain gauge.
Tapestry needle
Yarn: Weight- #3, DK, Light Worsted 100% cotton
Gauge: Rnds 1-5 = 2”
Crochet Terms used in this pattern: US

Crochet 3d Heart Pattern – How to Crochet a Heart
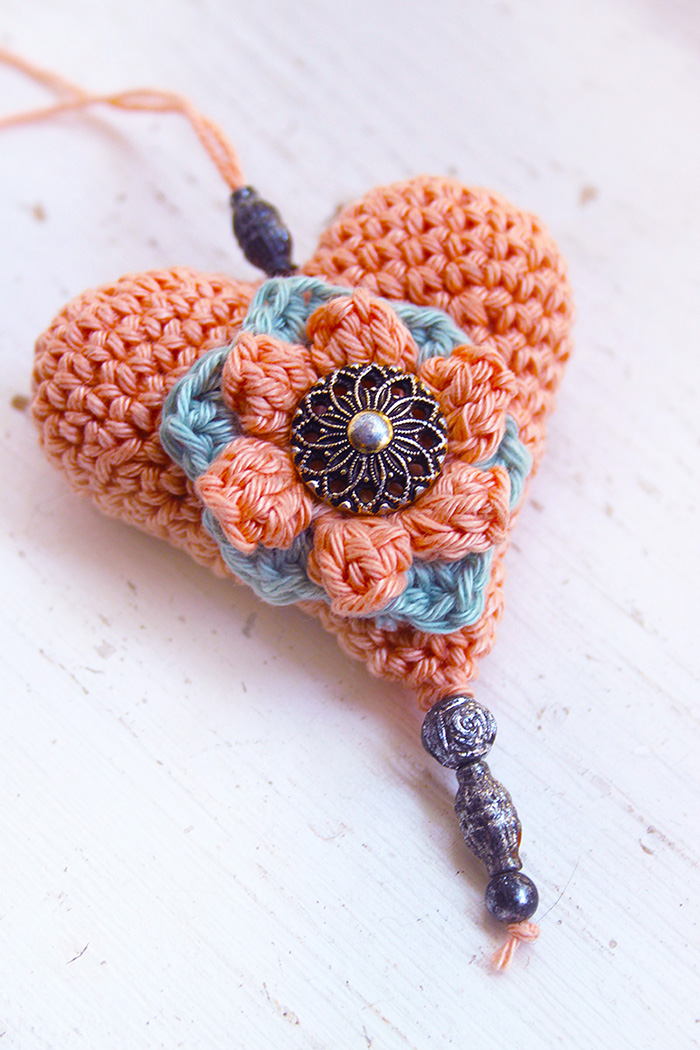
 Here is my pattern for the heart. This is a very simple project, but very interesting. Especially if you give a little decoration to the project.. This heart is decorated like vintage.
So, how to knit a heart.
Abbreviations:
Magic ring
Single crochet (sc)
Increase (inc – 2 sc in same stitch)
sc2tog (two sc together)
Slip stitch (sl st)
Stitch/Stitches (st)
() – indicates the total number of sts for that round
note: this pattern is crocheted in continuous rounds so unless I’ve noted otherwise you do not need to join at the end of each round. I Also suggest using a stitch marker to mark the last stitch of each round.
You will need:
Les then 40 g Worsted Weight Yarn category 4 in any colour
3.25mm(D) hook
Yarn needle
stitch marker
Crochet pattern heart:
STEP 1 (FIRST PIECE)
Make a magic ring
R1: Sc 6 in magic ring (6 st)
R2: 2sc in each st (12 st)
R3: *sc, 2sc in next st* x 6 (18 st)
R4: *2sc each in next st, 2sc in next st* x 6 *sc 2, inc* x 6 (24 st)
R5-8: Sc 24 around (24 st)
Finishing: sl st in next st and fasten off.
Cut yarn leaving tail.
STEP 2 (SECOND PIECE)
Make a magic ring
R1: Sc 6 in magic ring (6 st)
R2: 2sc in each st (12 st)
R3: *sc, 2sc in next st* x 6 (18 st)
R4: *2sc each in next st, 2sc in next st* x 6 *sc 2, inc* x 6 (24 st)
R5-8: Sc 24 around (24 st)
Finishing: sl st in next st and DO NOT cut the yarn!
STEP 3 (JOINED PIECES)
Place the first piece in front of second piece, join them with 6 sl st continue to work around the edge of joined pieces
We have round completed with 36 sc)
Rd 1: Sc around (36)
Rd 2: (Sc in next 4 sts, sc2tog) around (30)
Rd 3: (Sc in next 3 sts, sc2tog) around (24)
Rd 4: (Sc in next 2 sts, sc2tog) around (18)
Rd 5: (Sc in next st, sc2tog) around (12)
While stuffing makes sure the tail you used to close the gap is not stuck inside, you’ll need it later to pull tight and shape the heart.
Continue with “sc in next st, sc2tog” until you heave 5 sts left.
Cut yarn and pull it through the last loop. Now pull the Top A tail tight to shape the heart and hide the tail inside with tapestry needle.
With a tapestry needle, weave the tail through the front loops of the remaining 5 stitches and pull it tight to close. Weave in yarn end!
Crochet heart is ready!
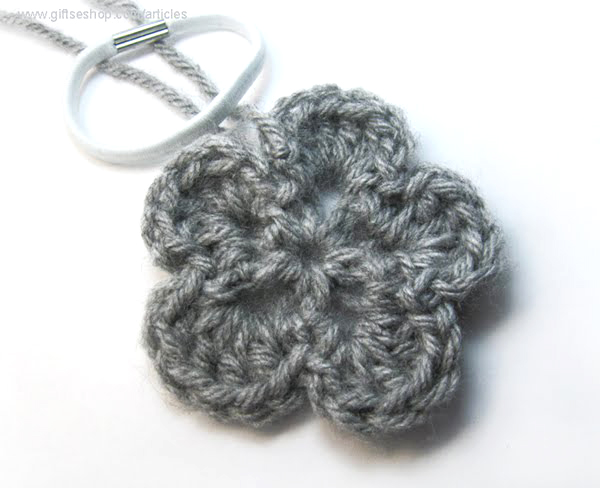
Crochet Flower for Hat Free Flower Pattern

Hook: Size US 7(4.5 mm)
Abbreviation:
ch – chain
sl st – slip stitch
sc – single crochet
dc – double crochet
hdc – half double crochet
tr – treble crochet
picot – chain 3, slip stitch to first chain
Color A (yellow).
For crochet small flower ch 4, join with sl st to first ch to form a ring
Rnd 1: Ch 1, sc in ring, * ch 3, sc in ring*, repeat * to* around 3 more times, ch 3, sl st to first sc to join (5 ch-3 loops).
Rnd 2 (petal round): * (Sc, ch 1, 3 dc, ch 1, sc) in each ch-3 space around, sl st to first sc to join. Fasten off (A).
Color B (red).
Rnd 3: Push one of the petals forward, so that you can work behind the petals, insert hook through ch-3 space from Rnd 1 and out through the foundation ring, yo, draw up a loop, ch 1, sc in same space, * ch 4, sc into ring through ch-3 sp of next petal *, rep * to* around 3 more times, ch 4, sl st to first sc to join (5 ch-4 loops).
Rnd 4 (petal round): * (Sc, hdc, dc, 2 tr, picot, 2 tr, dc, hdc, sc) in each ch-4 space around, sl st to first sc to join. Fasten off. Weave in ends.
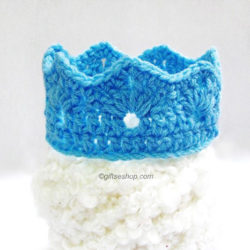
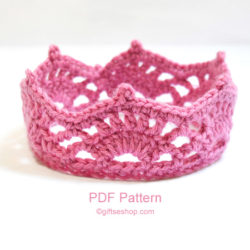
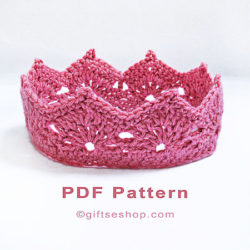
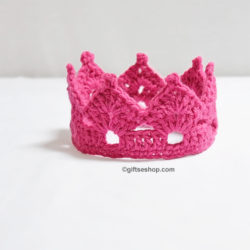
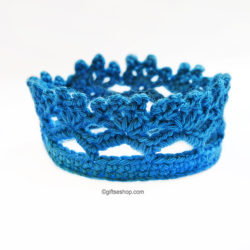
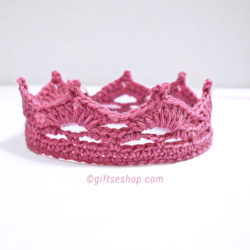
Crochet Crown Patterns
 Crochet tiara headband patterns.
This Newborn Crochet Crown is just too cute and perfect for a photo shoot with your little Prince or Princess!
The instructions are detailed and easy to follow and the final result is adorable!
Your little princess will love this crown and it can also be a great present.
Make a pink one for a baby girl- newborn princess crown or blue for a baby boy – crochet king crown.
It is some easy and quick crochet crown patterns, suitable for beginners.
It is a simple and fun project you can do in couple of hours and less. These crowns and tiaras make an excellent gift for every little boy or girl. Enjoy!
-
Crochet Pattern Princess or Prince Crochet Crown Newborn Pattern—Photography Prop Pattern
$3.00 Add to cart -
Crochet Baby Crown Pattern, Princess or Prince Crown Baby Tiara in PDF
$3.50 Add to cart -
Crochet Crown Pattern- Princess Crown – Princess Tiara – Prince Crown – Photography Props N77
$3.20 Add to cart -
Crochet Crown Pattern PDF N59
$3.50 Add to cart -
Crochet Crown Pattern Princess Tiara Headband n50
$3.20 Add to cart -
Crochet Crown Pattern – Princess or Prince Crown PDF Multiple Sizes n51
$3.20 Add to cart -

Crochet Crown Pattern – Princess Crown Headband PDF N49
$3.20 Add to cart -
Crochet Pattern – Crochet Crown Pattern Baby Girl Princess Costume Photo Prop no87
$3.20 Add to cart -
Crochet Baby Crown -Crochet Crown Pattern- Crochet Tiara Pattern for Beginners n72
$3.00 Add to cart
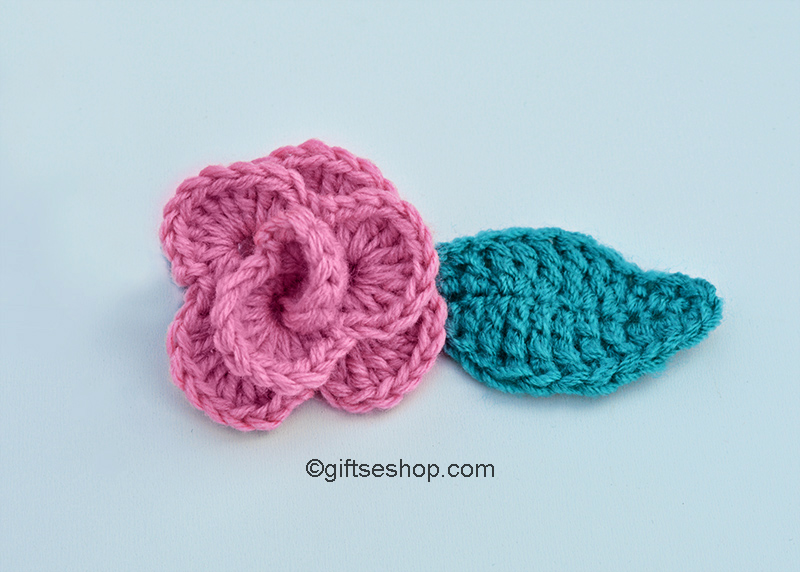
Crochet Leaf Pattern for Crochet Flower Irish Crochet Motifs
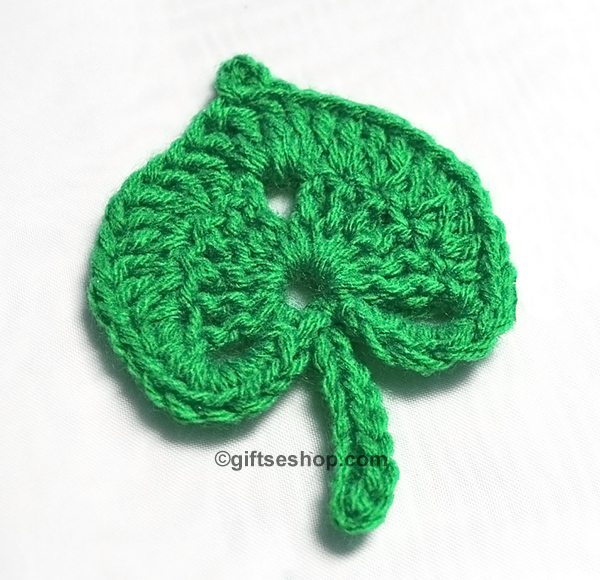
This pattern for beautiful crochet leaf You can use for creating with crochet flower or like irish crochet motif.
This crochet leaves quick to make and can be put to all sorts of pretty uses. Use them to embellish bags, hats, make them into brooches. Try making lots of them and string them together as a scarf or to make your own flowery bunting decoration.
Skill Level: Easy
Materials Needed:
– Small amounts of Aran weight yarns (#4) in color of your choice
– Crochet Hook, Size G/4.25 mm (I used this size hook to get this leaf, but you can use any size hook to get the size that you want)
– Yarn Needle (Used for working in loose yarn ends)
Gauge: Gauge doesn’t really matter for this pattern. Just try different hooks to get a bigger or smaller leaf.
Crochet Leaves Pattern
Make a magic loop.
Row 1: Chain 5. Work in magic loop 6 tr, ch3, 6 tr. Ch5, sl st in magic loop. Turn.
Row 2: Now work up the other side of the leaf.
6sc under 5ch-sp. In the next tr, work 1 sc. In the next tr, work 1 sc. In the next tr, work 2 hdc.
In the next tr, work 2 dc.
In the next tr, work 2 dc.
In the next tr, work 1 dc.
Under 3ch-sp, work dc, dtr, (dtr, ch3, sl st in third ch from hook-picot), dtr,dc.
In the next tr, work 1 dc.
In the next tr, work 2 dc.
In the next tr, work 2 dc.
In the next tr, work 2 hdc.
In the next tr, work 2 dc.
In the next tr, work 1 sc.
In the next tr, work 1 sc.
6sc under 5ch-sp.
Sl st in the magic loop.
To add the stem, ch 8.
Turn andsl st in second ch from hook, 1sl st in each ch 1 sc in each chain.
Sl st in the first stitch of the leaf.
Fasten off and keep 15 inch length of yarn to sew leaf onto hat or purse.
Weave in the loose end at the beginning of the leaf.
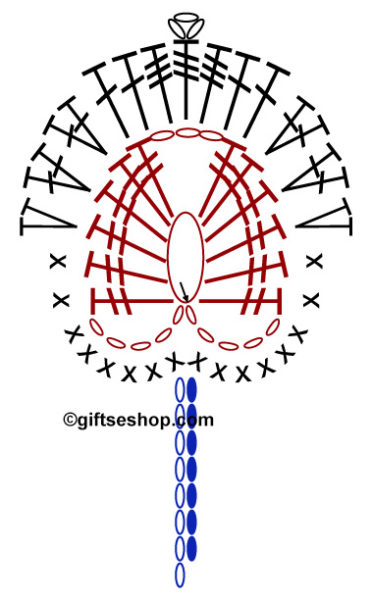
Crochet abbreviation
hdc half double crochet
lp(s) loops
p picot
ch chain stitch
ch-sp chain space
sc single crochet
sk skip
Sl st slip sitich
dc double crochet
sp(s) space(s)
st(s) stitch(es)
dtr double treble
tr treble crochet
WS wrong side
***You may make and sell products from my patterns but if you do I ask that you link back to my post. Please do not copy and post this pattern and claim it as your own. Please do not re-publish photos as your own. ***
©giftseshop.com
Related with crochet flowers, crochet leaf pattern, crochet motifs, crochet motif patterns, crochet leaves pattern, crochet leaf, Irish crochet.
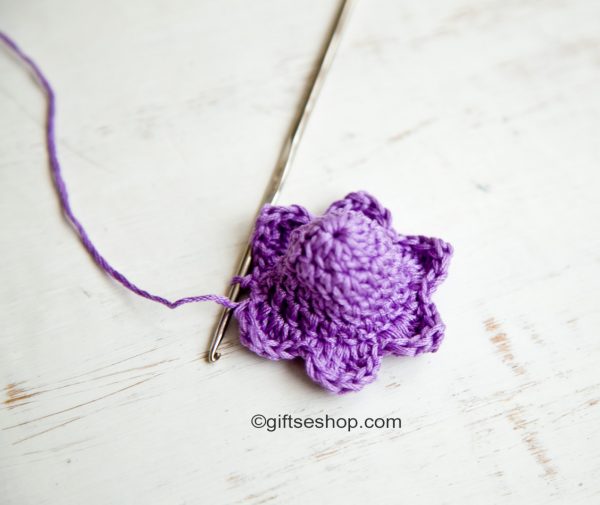
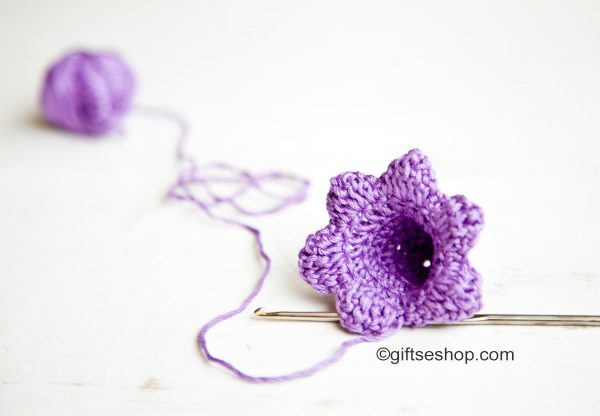
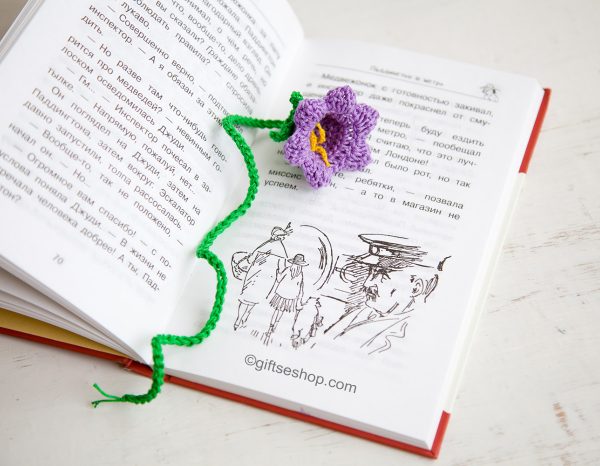
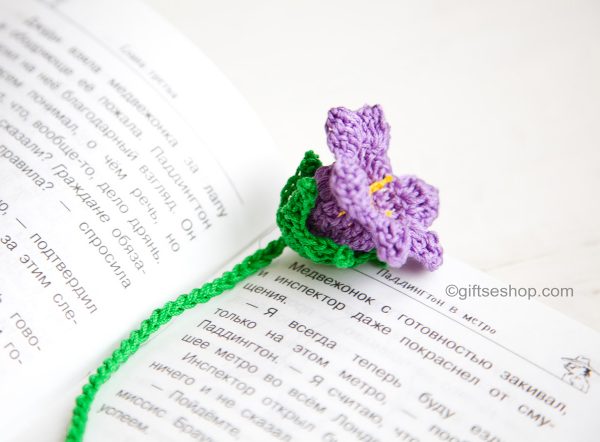
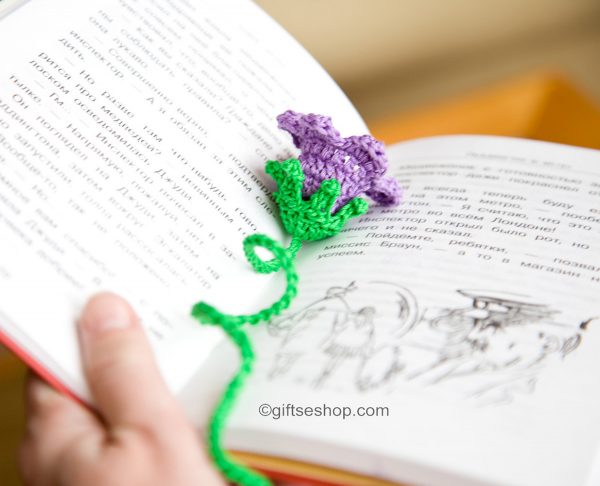
Free Crochet Bell Flower Pattern – Crochet Bookmark Pattern
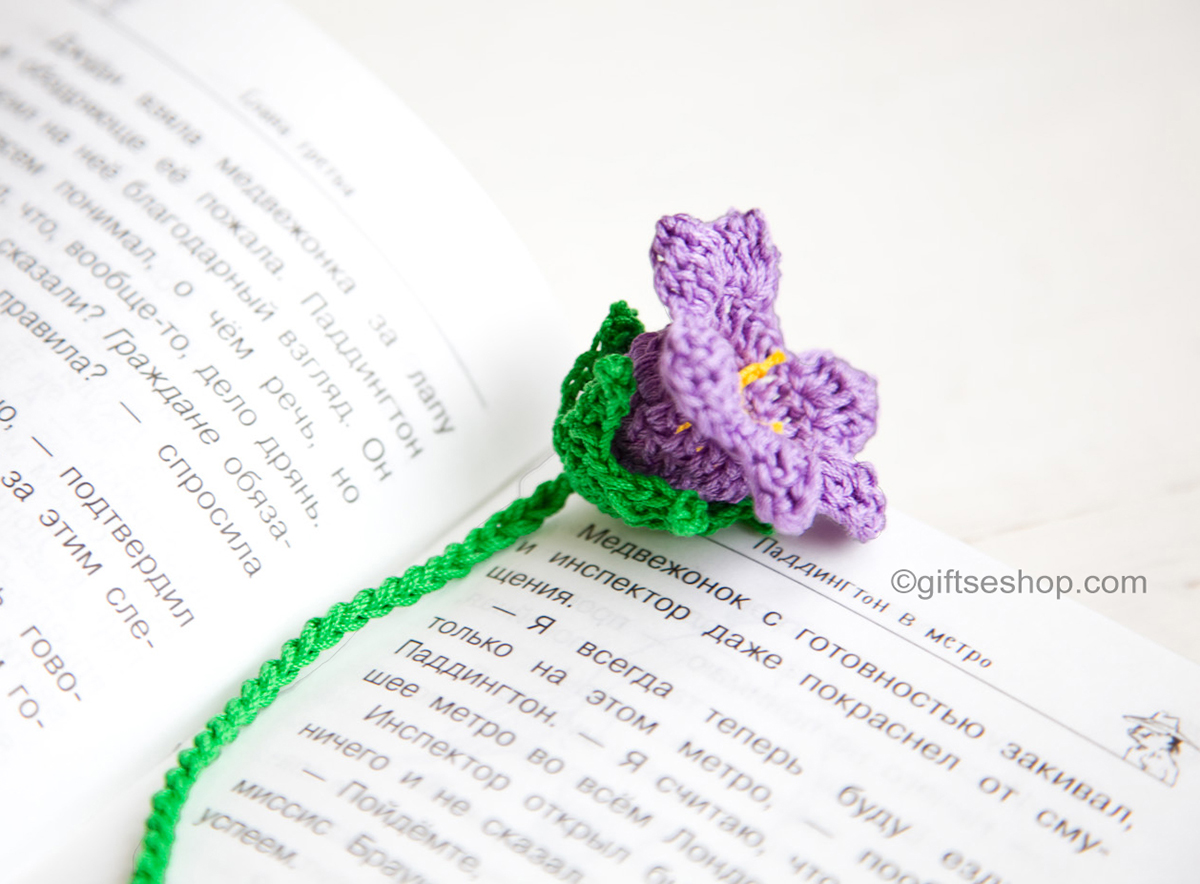
You are welcome to crochet the flower bookmark following the free pattern instructions.
It is super simple pattern for beginners and pure bliss to make.
When I first learnt to crochet, I remember the one thing I enjoyed crocheting the most was flowers.
Crochet flower are great fun to do by themselves but you can also add them to so many other projects, such as appliqués on hats.
Skill level: beginners
Abbreviations:
Sc = Single crochet
Ch = Chain
Sl = Slip stitch
Inc = Increase
Dec = Decrease
Tc = Triple crochet
Dc = Double crochet
Inc tc = 2 triple crochet in same stitch
Inc dc = 2 double crochet in same stitch
Hdc= half double crochet
Dec hdc= half double crochet 2 stitches together
Inc hdc= 2 half double crochet in same stitch
So here it is,
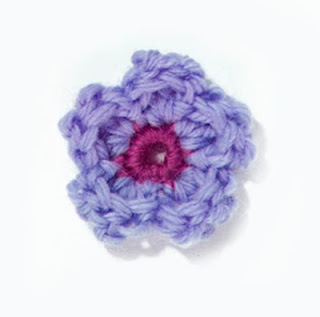
Bell Crochet Flower Pattern
Hook: any size, just choose a yarn type that matches, I used 2mm crochet hook
Cotton crochet thread: green, yellow and lavender
Note: I used chainless starting dc for every first dc of each round/row instead of ch 2. Ch2 count as dc.
Flower: using lavender yarn.
R1: form a magic ring, 12 dc into ring (first dc is ch2), sl into first st to join =12sts.
R2: (dc, 2dc in the same dc) x repeat 6 times, total 18 sts, sl into first st to join.
R3: 18 dc around, 18 sts, sl into first st to join.
R4: same as R3
R5: (sc, dc) into first st, (tr, dtr, tr) into next st, (dc, sc ) into next st, you have just finished first petal. *(sc, dc) into first st, (tr, dtr, tr) into next st, (dc, sc) into next st* repeat ** 4 times. (sc, dc) into first st, (tr, dtr, tr) into next st, (dc, sc) into last st, sl into first st to join. (fasten off, weave in ends)
Sepals: using green yarn
R1: form a magic ring, 12 dc into ring, 12 sts, sl into first st to join.
R2: (ch6, sc into 2nd chain from hook, sc, sc, hdc, dc across. Skip 1 st, sl into next st from first chain) x repeat 6 times around. (fasten off, weave in ends)
Attach to the flower
Stamens: (make 3), using yellow yarn.
Crochet a chain of 9 (fasten off)
Use yarn needle to thread through the flower (fasten off, weave in ends).
Crochet a chain of your desirable length, you’ll have a unique bookmark.
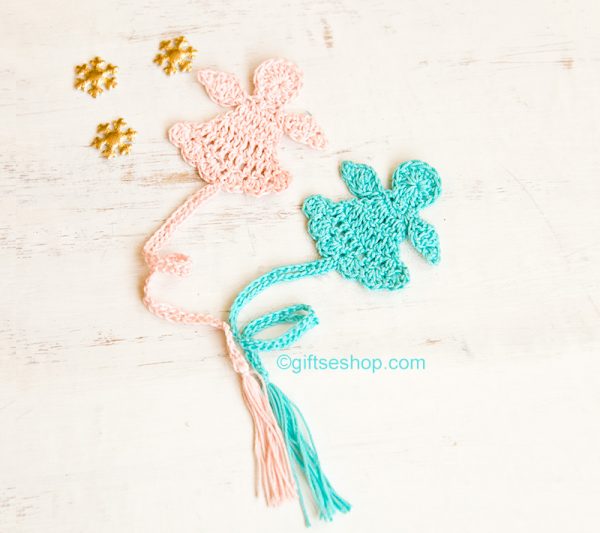
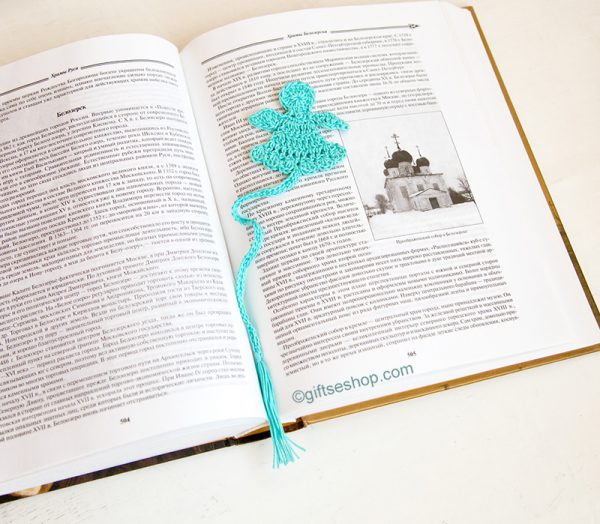
Christmas bookmarks crochet angel easy crochet patterns
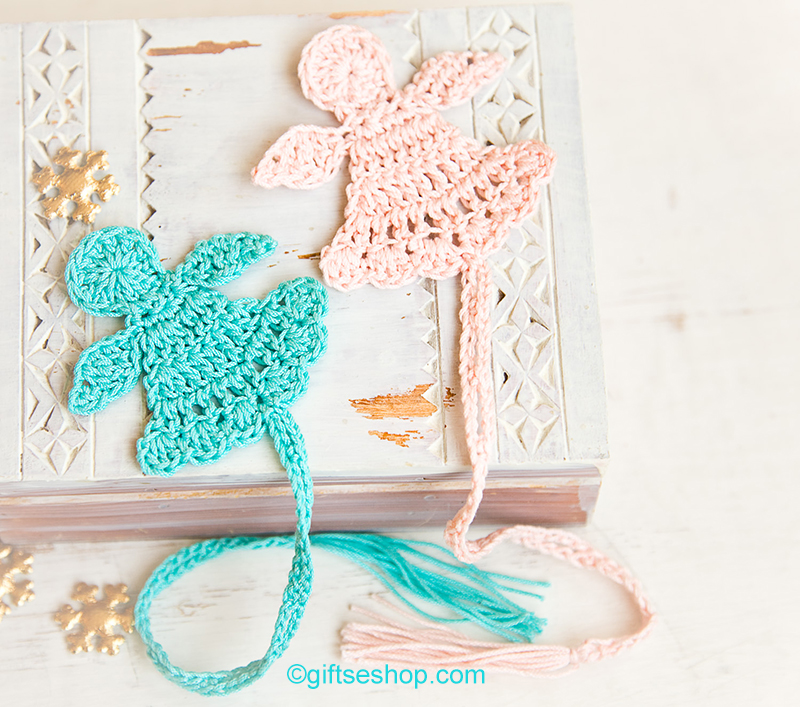

Crochet an angel bookmark for your bookworm friend. It is very beautiful Christmas gift. Whenever you use this cross bookmark, you will be reminded of how much you are loved by God.
I make a nice bookmark with a cord and tassel attached into the top of the halo. But it could also be used as a decoration for a Christmas tree or several angels attached to a long chain as Christmas bunting.
Enjoy free crochet patterns from angels to sachets Bookmark Patterns.
Skill Level: Easy
Materials: #3 Crochet Cotton Thread
How to knit crochet angel-crochet easy pattern for beginners
INSTRUCTIONS for crochet angel bookmark:
HEAD:
I start with a magic loop but you could use this method
Ch 3, 12 dc in 3rd ch from hook. Join with a slipstitch in first dc. (12 dc)
NECK:
Ch 1, slipstitch in next head st, sc in next st, slipstitch in next st. Don’t pull these slipstitches tight.
WINGS:
1st wing: Ch 8, sc in 2nd st from hook, hdc, dc, tr, dc, hdc, sc across the next 6 chains.
Twist work and slipstitch, sc, slipstitch in 3 sts of the neck.
2nd wing: Ch 8, sc in 2nd st from hook, hdc, dc, tr, dc, hdc, sc across the next 6 chains.
Twist work and 2 sc in first st, sc in next st, 2 sc in last st of neck. Ch 2, turn.
SKIRT:
Row 1: 2 Dc in first st, dc in 3 sts, 2 dc in last st. Ch 2, turn. (7 dc)
Row 2: 2 Dc in first st, dc in 5 sts, 2 dc in last st. Ch 2, turn. (9 dc)
Row 3: 2 Dc in first st, dc in 7 sts, 2 dc in last st. Ch 1, turn. (11 dc)
Row 4 and Tail: 3 dc in first st, *slipstitch in next st, 3 dc in next st. Repeat once. Ch 49, sc in 10th ch from hook, to form ring. *Ch 4, skip 4 sts, sc in next ch. Repeat from * until 4 chains remain, slipstitch in same st as first ch. 3 dc in next st, *slipstitch in next st. Repeat once. 3 dc, slipstitch in last st.
Fasten off. Weave in ends.
TASSEL of angel bookmark:
Cut 6 strands of thread about 6 inches long. Fold in half and draw loop through the circle at end of tail with a crochet hook. Draw the loose ends of the strands through the loop and pull them down tightly to form a knot. Trim ends of tassel evenly.
Related with crochet angel pattern, angel pattern, angel crochet, angel crochet pattern, angel bookmark, crochet Christmas angels.
You may also like other crochet and knitting patterns


Crocheting for Beginners- Crochet Stitch Patterns Griddle Stitch
The Griddle Stitch is a technique that creates a simple, awesome texture. It is great for baby garments, scarves, hats and home decor items.
Abbreviations:
ch = chain
dc = double crochet
rep = repeat
sc = single crochet
st(s) = stitch(es)
Craft Instructions
Multiple of 2 sts + 1 (add 2 for base chain)
1st row: Dc in 3rd ch from hook *sc into next ch, dc into next ch; rep from * to end, turn.
2nd row: Ch 2, dc in 1st stitch *sc in next sc, dc in next dc; rep from *
Rep 2nd row
Any weight yarn with the appropriate size crochet hook. Our sample was made using worsted weight yarn and a size H (5.0 mm) crochet hook.
Related with crochet stitches, crochet for beginners, learn to crochet ,single crochet stitch, crocheting for beginners, crochet stitch patterns, easy crochet stitches, crochet stitches for beginners.
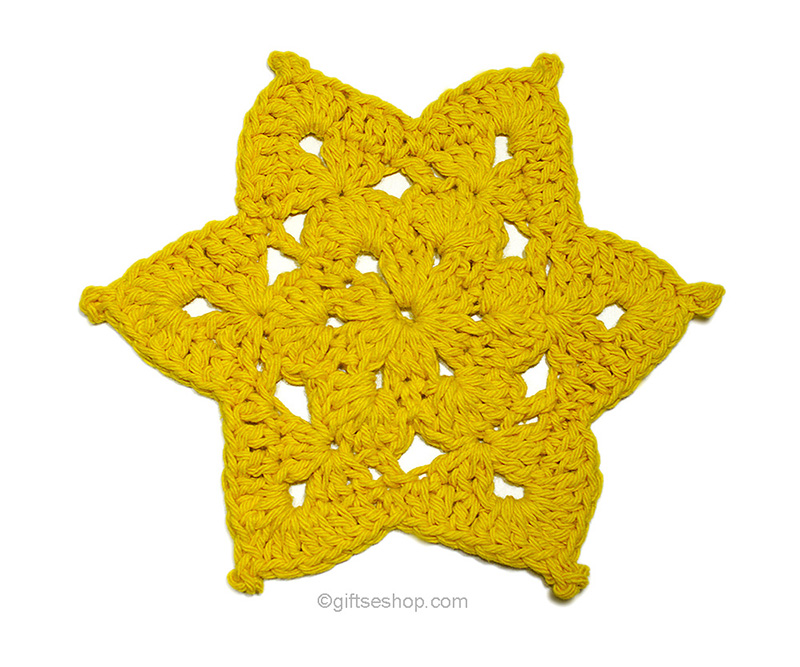
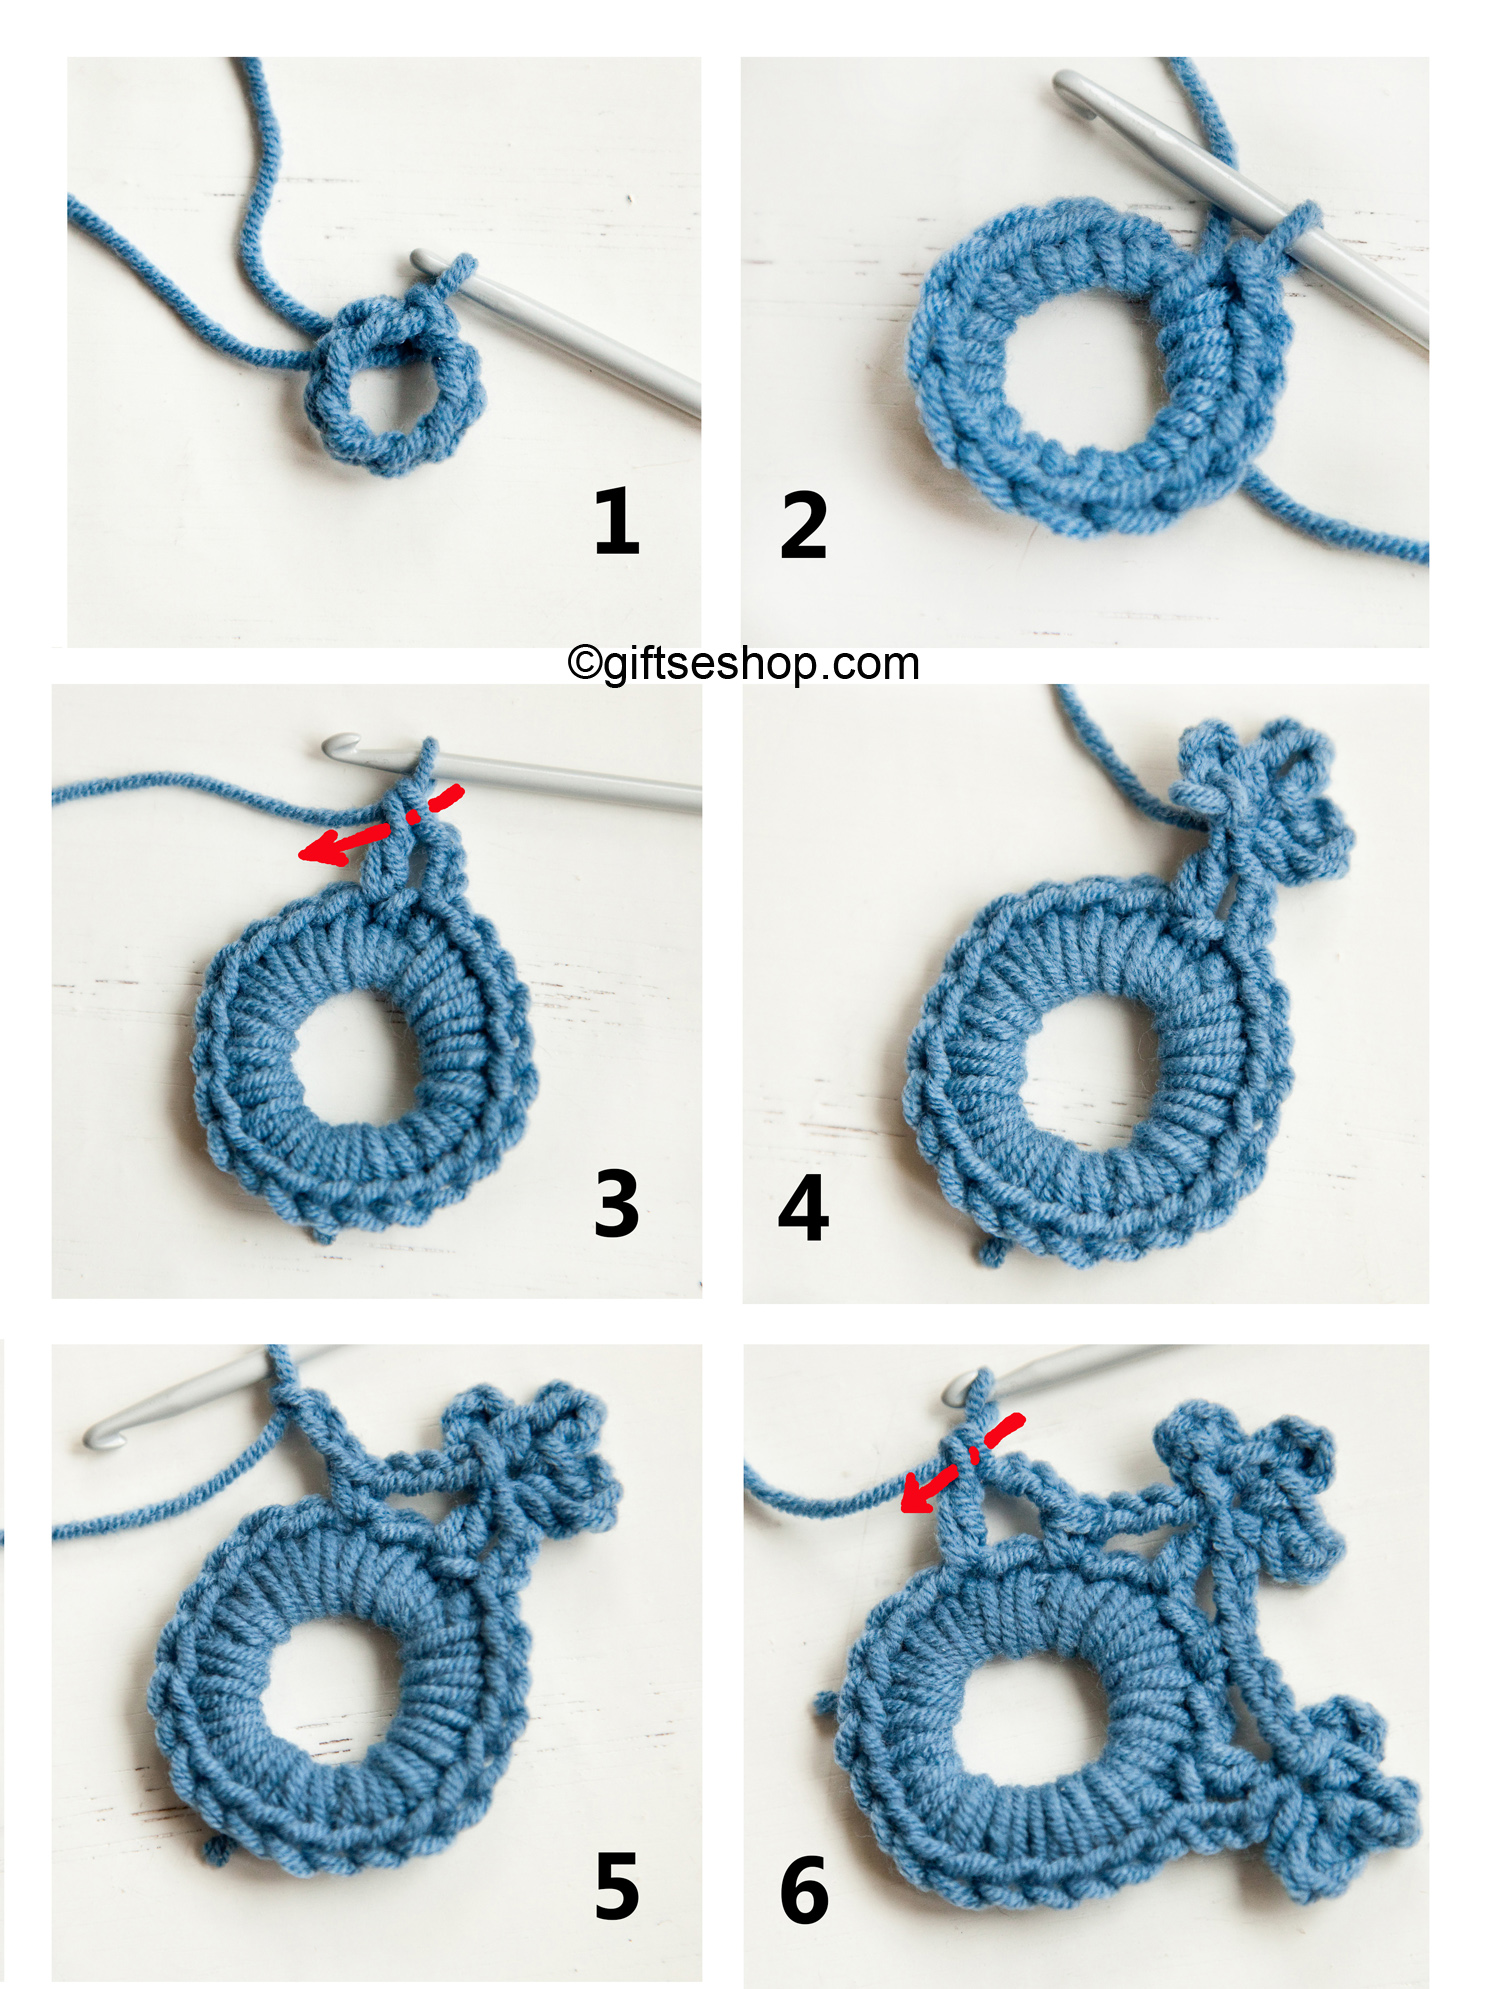
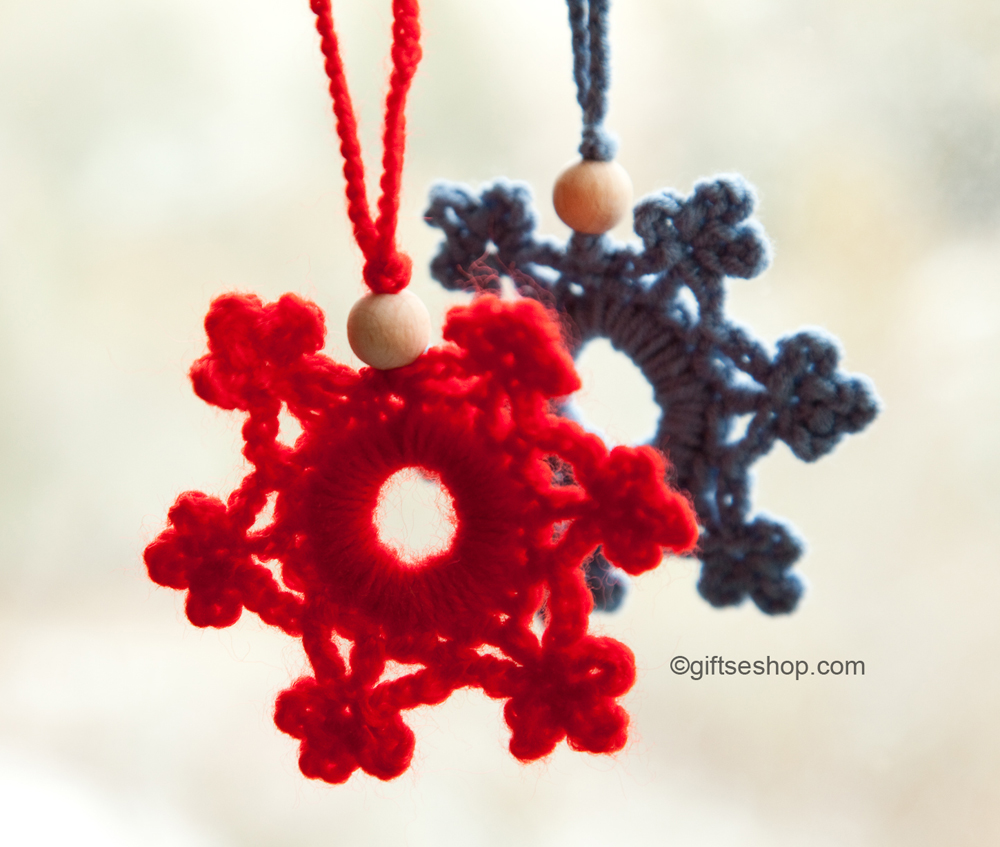
Snowflake Pattern Crochet Snowflake Christmas Tree Decoration
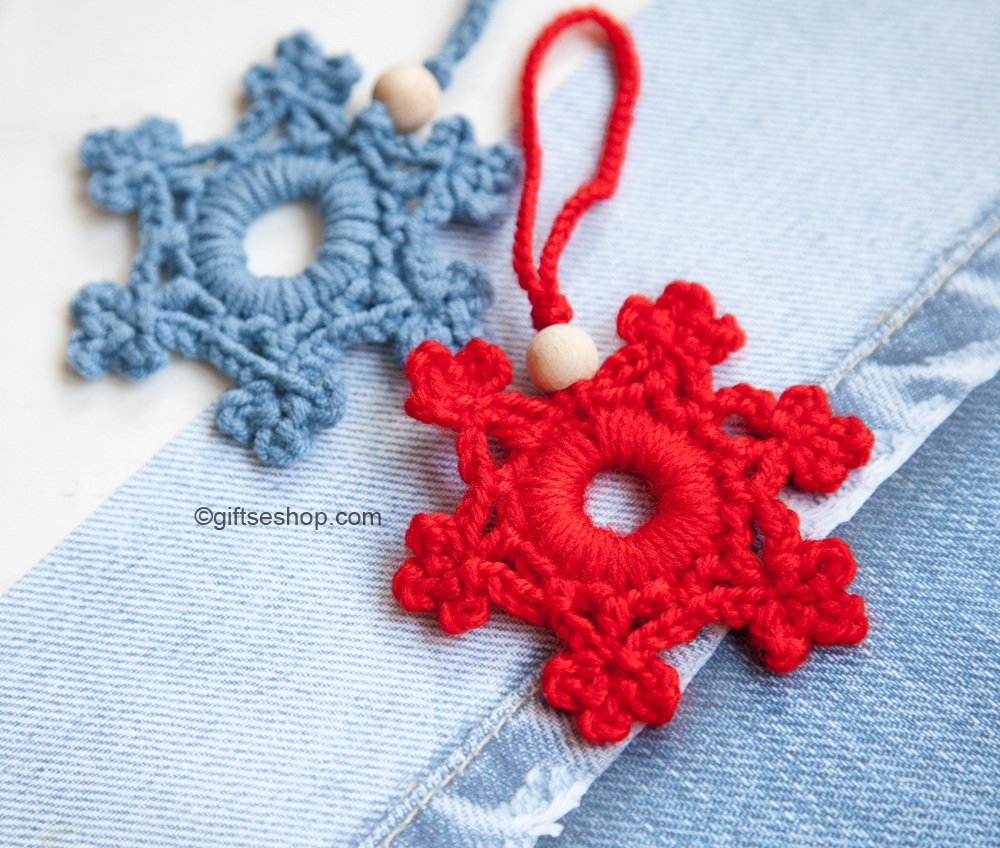
Snowflake Crochet Free Pattern for Holiday home and Christmas tree decorations.
This pattern for beginner and intermediate level crocheters. The size of the finished snowflake is approximately 2-3” in diameter, depends on yarn weight and crochet hook size. You can vary the size a bit if you use smaller or bigger size hook or different weight yarn.
I use medium to worsted weight (weight category #4) cotton yarn.
Ch 9, join with sl st to form ring.
Rnd 1: Ch 1, 15 sc in ring; join with sl st tofirst sc.
Rnd 2: Ch 1, 23 sc in ring below round 1; join with sl st to first sc.
Rnd 3: *ch3, dc in the second sc of the previous row,
3ch, dc in first ch (pico1)
3ch, dc in first ch (pico2)
3ch, dc in first ch (pico3)
ch3, sl st in the second sc of the previous row.*
This is the first “petal”. We need 6 petals, so repeat from * to* 5 more times.
The crochet snowflake is ready! 🙂
Related with christmas tree decorating ideas, christmas tree décor, christmas tree decoration, snowflake pattern, crochet snowflake, christmas crochet patterns, snowflake crochet pattern.

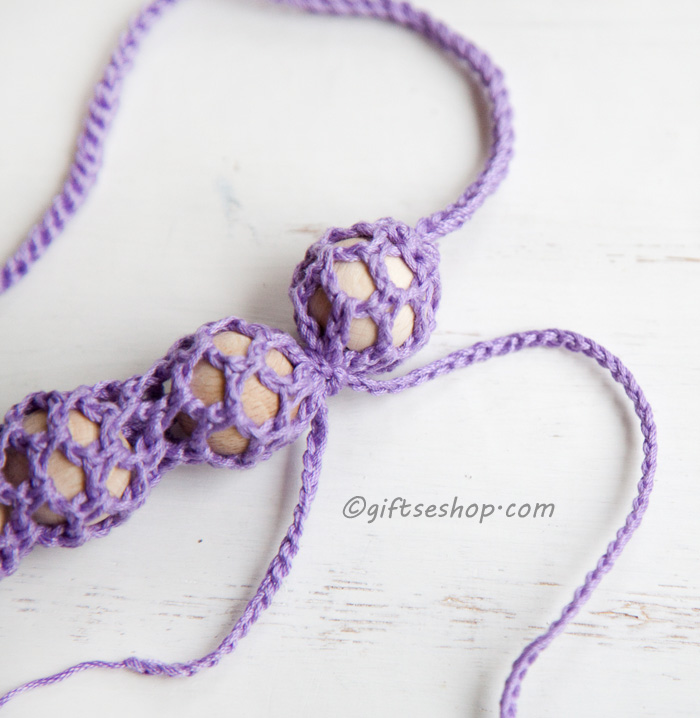
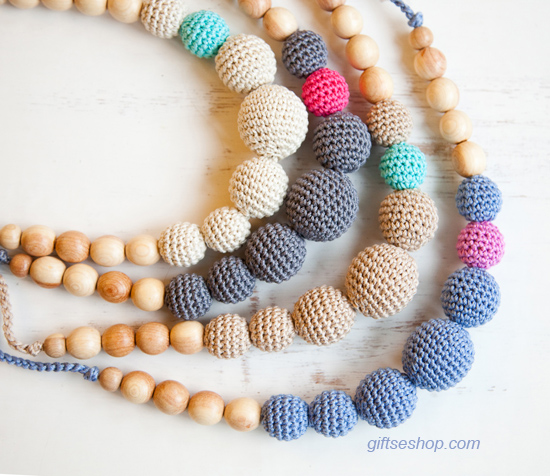
Crochet Nursing Teething Necklace DIY

Materials:
You want to try to find non-toxic, natural materials
– Unfinished wooden beads in ¾ and 1.
– Cotton yarn. I used Lily Sugar N Cream yarn.
– Size 2.25mm/ US B-1 Crochet Hook
– Tapestry needle
For crochet tube I use Chain Loop Mesh Stitch
This lacy stitch is a open crochet stitch made with loops of chains. It is very easy to crochet. You just need to know the chain and single crochet stitch.
This project is very quick to do, it can easily be finished in 10-20 minutes and looks great. Customize it and make it your own necklace to suit any occasion!
Chain 4, slip stitch to join and form a ring.
Round 1
* ch 3, 1 sc under chain ring *, repeat 3 times, ch 3, 1 sc into first chain space, so you have a 5 chain space in round.
Round 2
In the second and following rows, you’ll make a single crochet in each ch-3 space.
* ch 3, 1 sc into next 3-chain space *, repeat 3 times, ch 3, 1 sc into first chain space, so you always have a 5 3-chain space in round.
Repeat row 2 until your tube measures the desired length.
Now you see making crocheted mesh is one of the easiest crochet techniques —plus it works up really quickly.
Make sure to measure and have enough room to drop the wooden bead.

Now it’s time to pull the thread through all beads.
For extra security I strung my beads on a chain tail, but you can braid your yarn or use ribbon.
Drop beads down through the hole at the top.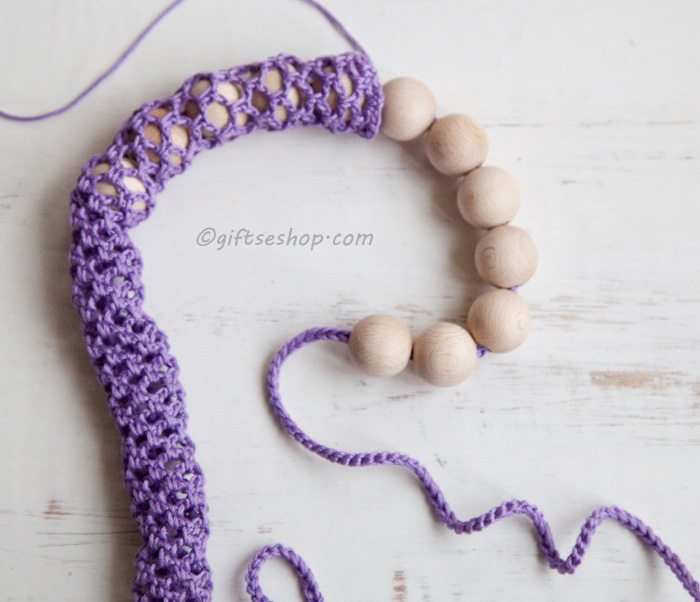
Crochet another chain tail to make knots between the beads.

Tie the ends.
You can tied a toggle clasp on the ends of necklace but this isn’t safe if you are using this as a teether. You can always just leave the necklace extra long and tie it around your neck when you want to wear it. Or leave it tied because it should be long enough to slip over your head.
I think I might even wear my new necklace as a stylish accessory!
Maybe you’re wondering other free necklaces patterns:

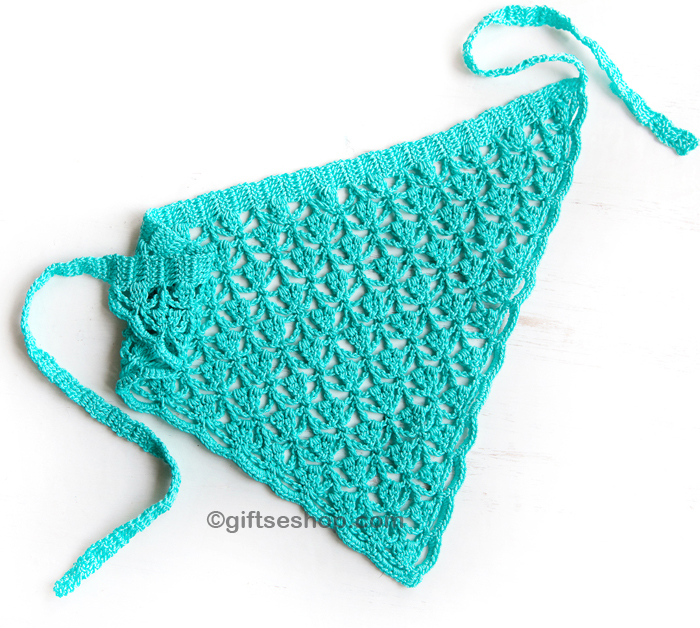
Bandana Kerchief Free Crochet Pattern

This hand crocheted kerchief or bandana can been made with a light weight cotton blend thread.
I chose the colors of the beach for this kerchief. This is my beach bandana, its perfect for beach or pool. Great for Artist and Gardeners. Perfect for travel and casual wear. Adds that “finished look” to summer outfits and if you have long hair they are great for keeping your hair off neck and out of your face.
This is a basic triangle head scarf made in double crochet.
Chart: crochet kerchief pattern
Here quick and easy chart to follow:
Related: crochet bandana pattern, bandana crochet, crochet kerchief pattern, kerchiefs, head kerchief, hair bandanas
Have a look
If you are interested in crochet bandana patterns,
you can read this link Crochet Kerchief Pattern
Crochet Cowl Neckwarmer Free Pattern
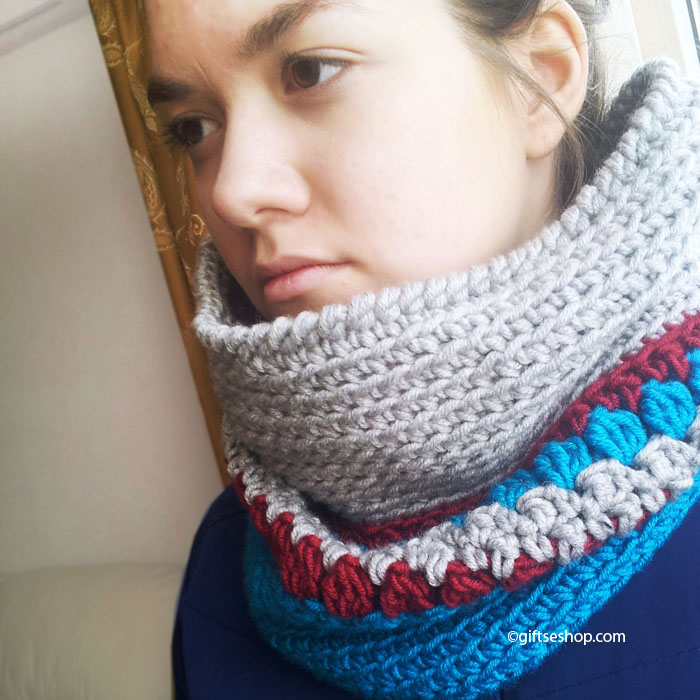
This beautiful cowl is crocheted using a blue, light grey and red wool acrylic blend yarn. Free pattern.
Size: crochet cowl diameter 65 cm/25.6”, height 32/12.6”
Yarn: thick thread, hook 6.5 mm/ US K 10 1/2
Chain loosely for desired length.
1-14 and 19-29 rows back loop single crochet stitch
“Back loop single crochet” is a variation of single crochet stitch. As the name suggests, you achieve this look by working your single crochets through the back loops only.
When you flip it like this, it looks and performs a bit more like ribbed knitting, with the stretch going in the same direction that you’d expect from a knitted rib.
Finishing: reverse sc.
See her other patterns here
Princess or Prince Crochet Crown


Vintage Crochet Gloves Free Pattern
Do you want to learn how to crochet lovely vintage gloves?
Here it is, right at your fingertips, everything you need to turn your hand to crocheting gloves.
Follow the easy step-by-step instructions of this vintage crochet pattern to make this stylish set of gloves in crochet. There is absolutely no charge for personal use of this easy crochet glove pattern.
Instructions are right down to the last detail – and easy as pie to understand and follow.
NOTE
These crochet lace gloves are a medium size.
STEP-BY-STEP INSTRUCTIONS
Crochet gloves pattern free.
Easy crochet gloves pattern.
To enlarge click on the image


How to Crochet Easy Baby Blanket- Free Crochet Pattern
Beautiful, simple and easy pattern for a baby blanket. Something that’s quick to make.
This easy baby blanket is knit using two colors, with lace knitting for the edges.
The blanket is a beautiful open work pattern using a simple and beautiful stitch crochet pattern.
Free pattern for beginners.
Can be knit to any size.
Free Baby Blanket Crochet Pattern. Crocheting a simple easy babies blanket is a delightful way to welcome a new arrival into the world, something you have created with love.
Abbreviations
US Crochet Abbreviations:
ch = chain
sc = single crochet
st = stitch
sl = slip
dc= double crochet
Follow the link Instant download
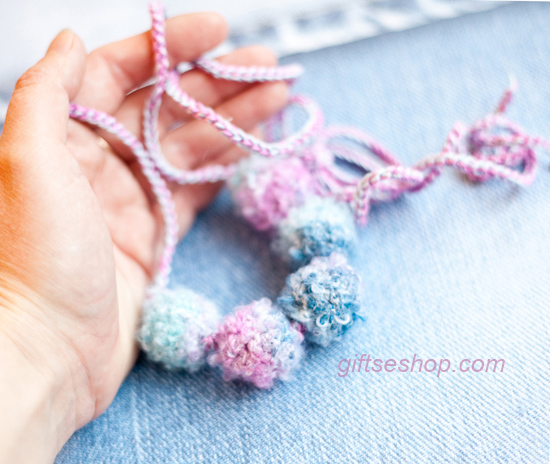
How to Make Crocheted Beads and Crocheted Beads Necklace Free Pattern

Crocheting lovers enjoy crochet bead necklace- free pattern. Stylish accessory they seem to be super trendy today.
Materials & Tools:
1. Cotton thread
2. Use proper size of crochet needle for the yarn you chose to use for the bead.
I use Crochet hook: 1.9 mm
3. Plastic or wooden bead 20mm
4. Tapestry Needle with long eye
Crochet Abbreviations
ch = chain
sc = single crochet
sc2tog=single crochet 2 together
st = stitch
sl knot = slip knot
sl st = slip stitch
fo = fasten off
Patterns:
Crochet On 20mm bead
Start the bead with a magic ring
Round1: ch2, 8sc in ring (8 st)
Pull the stray end taut
Round 2: *2sc in each st* repeat 8 times (16 st)
Round 3: *1sc in first st, 2sc in next st* repeat 8 times (24st), mm
Round 4 – r8: 1sc in each st first st, around, mm
Continue crocheting without increasing while your bead is almost covered with a crocheted cozy
Insert bead
Round 9: * sc2tog in first st, 1sc in next st* repeat 8 times (16st), mm
Round 10: *2sc in first st* repeat 8 times (8st)
Fasten off with a 3-4″ end.
Use a tapestry needle to insert the start tail through the hole and come out from the other side.
The thread ends I hide inside the bead.
You have learned how to crochet beads, now you can do crocheted jewelry,
such as this nursing necklace. Nursing necklaces are simply a necklace or piece of jewelry made for moms who happen to have small children. Nursing necklaces are simply a necklace or piece of jewelry made for moms who happen to have small children. Nursing necklace very easy to do and it’s great!
These beads crocheted from fluffy yarn. Very good for beginners, fluffy yarn hides all flaws.
I love these crocheted beads necklaces are not only for children but are very good as a rope necklace for the summer and they can be made in boho style.
Good luck!
Have a look more free crochet patterns
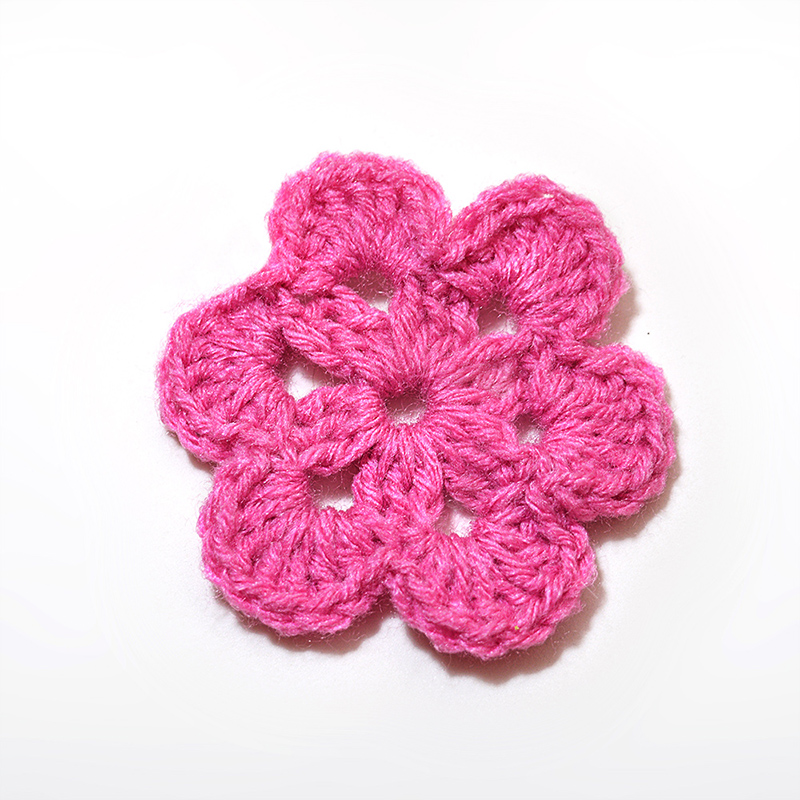
Free Crochet Flower Pattern Six Petals
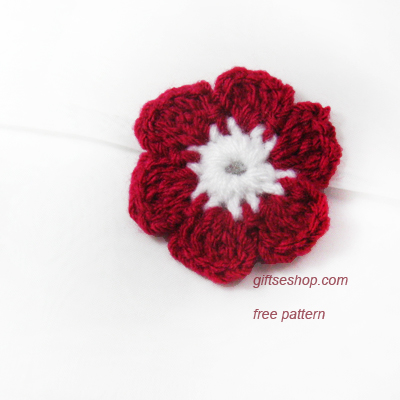
I created the crochet pattern for little flower .
These little crocheted flowers are so quick and easy to make. Good project for beginners.
These little flowers can be used in various different projects. Use them to embellish bags, hats, clothing or make them into brooches, hair accessories. Try making lots of them and string them together as a scarf or to make your own flowery bunting decoration.
Using white color:
Begin with a magic loop with sl st.
Round 1 – Chain 1 then single crochet 10 stitches into the ring, slip stitch into the first stitch to end
Fasten off and join burgundy color threads for petals to any outside stitch
Round 2 – ch3, 3 double crochet in the next stitch, ch3, slip stitch in the next stitch – first petals
ch3, 3 double crochet in the next stitch, ch3, slip stitch in the next stitch – second petals
ch3, 3 double crochet in the next stitch, ch3, slip stitch in the next stitch – third petals
ch3, 3 double crochet in the next stitch, ch3, slip stitch in the next stitch – fourth petals
ch3, 3 double crochet in the next stitch, ch3, slip stitch in the next stitch – fifth petals
ch3, 3 double crochet in the next stitch, ch3, slip stitch into the first stitch of the first petals – sixth petals
Fasten off.
©giftseshop.com
Note: You can place this material on your blog only with reference to this page
*************
Have a look other free patterns:
 5 petal crochet flower pattern
 easy crochet flower appliqué free pattern
Crochet Beads Necklace or Bracelet Free Pattern Tutorial
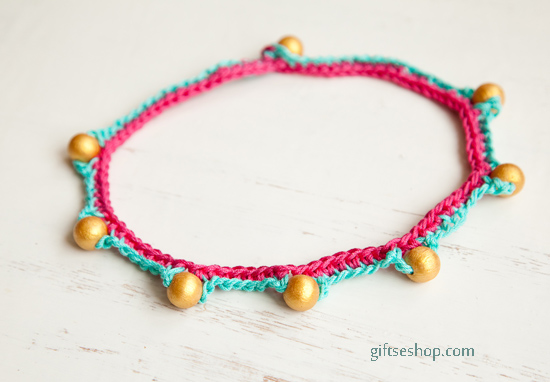
Crochet jewelry for beginners. This necklace is an easy beginning crochet pattern.
I used beautiful hand painted beads.
Crochet Hook: Size 2 mm its US B/1or UK 13 or your preferred size
Detailed Instructions
Thread 8 beads on crochet cotton thread.
Work with thread blue
Row 1 – Ch20, bsc, ch10, bsc, ch10, bsc, ch10, bsc, ch10, bsc, ch10, bsc, ch10, bsc, ch10, bsc,ch20
Attach pink yarn
Row 2 – ch6, sc in third st of blue row (buttonhole), sc in each stitch to end
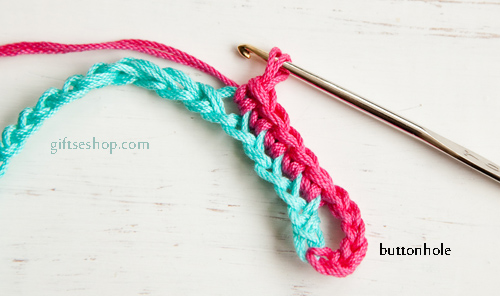
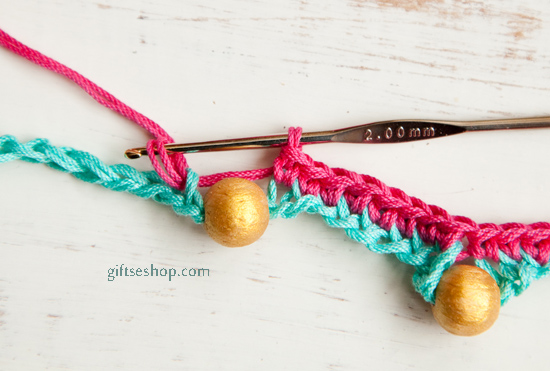
Finish off, attach last bead, weave in end.
Crochet Abbreviations
sl = slip stitch
ch = chain
sc = single crochet
bsc* = beaded single crochet
*Bead Single
Crochet: (bsc): Do a normal single crochet, except after you put your hook through the stitch in the previous row, pull a bead up to your hook and then yarn over using the crochet cotton thread on the far side of the bead. Then pull the loop through the stitch in the previous row. You will now have two loops on the hook and the bead will be looped against the piece. Yarn over and pull through both loops to complete the single crochet.
Crochet beaded necklace or bracelet pattern free.
Have a look more free crochet patterns